
Pre-installation preparation (roof inspection, tools needed)
Conducting a roof inspection before installation
Before starting any metal roof project, the roof must be carefully inspected. Installers should check for rust, loose panels, or structural weaknesses that could affect installation. A proper inspection ensures the surface is safe to work on and prevents unexpected issues later. Paying attention to slope angles and water drainage patterns also helps in planning where L feet will be mounted. This early step reduces risks and ensures the metal roof project runs smoothly from start to finish.
Gathering the correct tools and equipment
What tools are necessary to complete a reliable installation? Basic requirements include drills, measuring tape, wrenches, sealant, and personal protective equipment. Specialized clamps or cutting tools may also be needed depending on roof sheet type. Having tools prepared in advance saves time and avoids delays once the installation begins. For larger metal roof projects, organizing tools systematically improves workflow and efficiency.
Step-by-step installation process
Positioning and marking for accuracy
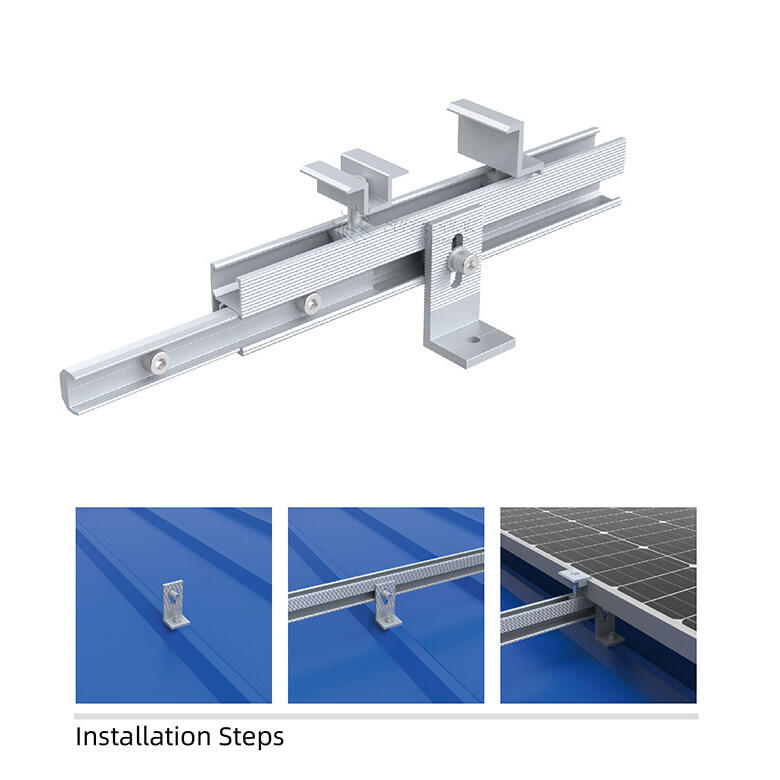
The first step in installing L feet on a metal roof project is marking precise locations. Installers should measure distances carefully to ensure solar rails align evenly. Using chalk lines or markers allows accurate placement across the entire roof. Correct positioning avoids misalignment of panels and guarantees maximum solar efficiency. This step builds the foundation for the rest of the installation process.
Securing L feet and attaching rails
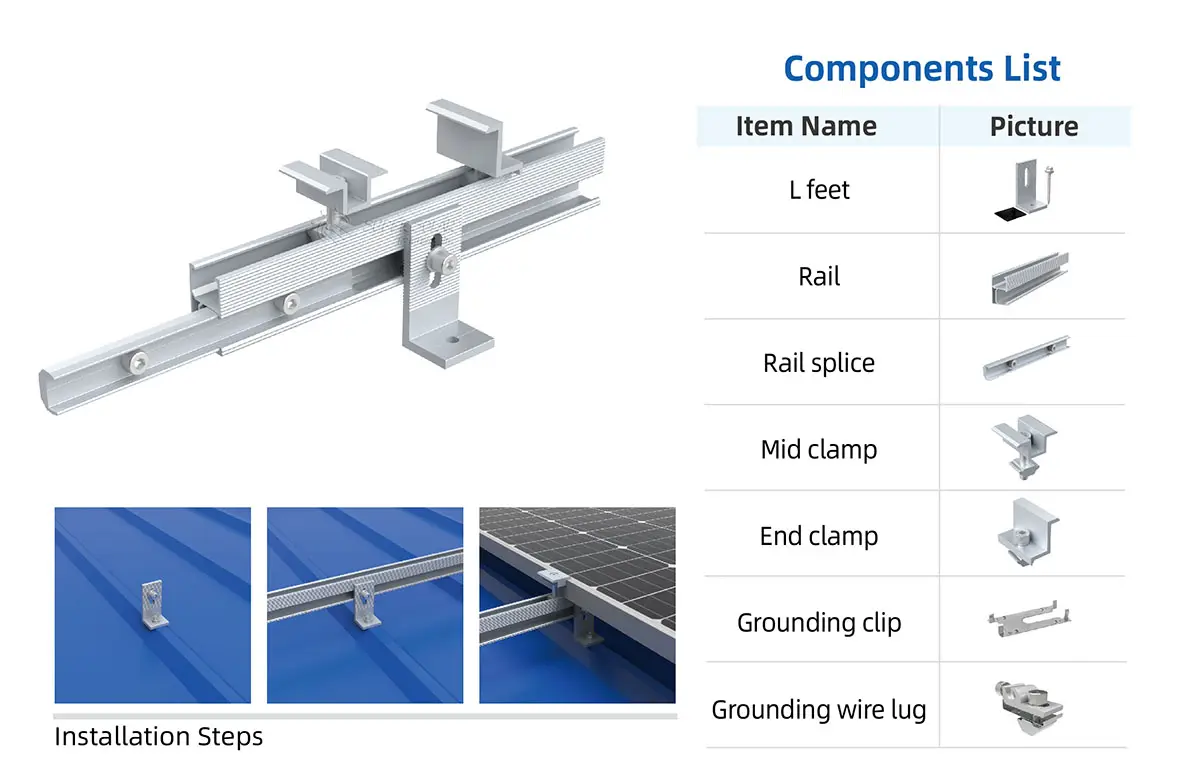
Once positions are marked, L feet are secured to the roof using appropriate fasteners or clamps, depending on the roof profile. For trapezoidal and corrugated roofs, screws with sealing washers are common. For standing seam roofs, non-penetrating clamps are used. After securing, solar rails are attached to the L feet, creating a stable base for panels. Ensuring each foot is tightened correctly prevents loosening and ensures safety throughout the project.
Tips for faster and safer installation
Organizing workflow to save time
In a large metal roof project, efficiency depends on proper planning. Installers can save significant time by pre-assembling components on the ground before moving them onto the roof. Clear communication among team members also reduces confusion and duplication of tasks. By organizing the workflow, installers complete projects faster while maintaining quality.
Ensuring safety at every step
Safety is always a priority when working on a roof. Installers must use harnesses, helmets, and non-slip footwear to reduce risks. Tools should be secured to avoid falling hazards. Weather conditions must also be considered—installations should not be carried out in heavy rain or strong winds. By following strict safety protocols, installers protect both themselves and the success of the metal roof project.
Common challenges and solutions
Addressing roof irregularities
Every roof has unique conditions. Uneven surfaces, damaged panels, or unusual slopes can complicate installations. In these situations, adjustable L feet are highly beneficial, as they allow flexibility in height and positioning. Installers should also use extra sealant or support brackets when needed to overcome irregularities. Being prepared for these challenges keeps the metal roof project on schedule and ensures lasting stability.
Preventing leaks during installation
One of the biggest concerns in a metal roof project is maintaining waterproofing. Improper sealing around fasteners or clamps can lead to leaks that damage the building. Using L feet with integrated rubber pads and applying sealant at every penetration point solves this issue. For standing seam roofs, non-penetrating clamps eliminate this risk entirely. Proper technique ensures the roof remains watertight for decades.
Downloadable resources (manuals, video tutorials)
Accessing installation manuals
Installers benefit from having detailed manuals that outline step-by-step processes. Manuals provide guidance on torque settings, fastener choices, and safety measures. They also include diagrams that simplify complex steps, making it easier for new teams to learn. Distributors offering manuals alongside L feet increase value for installers working on metal roof projects.
Learning from video tutorials
Video tutorials give installers a practical view of the process. By watching professionals demonstrate L foot installation on metal roof projects, teams can visualize each step clearly. These tutorials often cover common mistakes and provide tips to improve efficiency. Combined with manuals, videos ensure installers are well-prepared for projects of any scale.
FAQs
What tools are needed for installing L feet on a metal roof project
Basic tools include drills, measuring tape, wrenches, sealant, and protective gear. Depending on the roof profile, specialized clamps or fasteners may also be necessary. Preparing tools in advance improves efficiency.
How can installers ensure waterproofing in a metal roof project
Waterproofing is achieved by using L feet with integrated sealing pads, applying sealant at penetration points, or choosing clamp-style L feet for standing seam roofs. Proper technique ensures long-term protection.
What are the most common challenges in L foot installation
Challenges include uneven roof surfaces, misalignment, and potential leaks. Using adjustable L feet and following sealing best practices helps overcome these issues in any metal roof project.
Where can installers find resources to learn proper installation
Distributors often provide manuals, while video tutorials give practical demonstrations. Combining both resources ensures installers gain complete knowledge for reliable and safe installations.
https://youtu.be/DzcUA40Omq0?si=98D3ztQYVWTFVLQT
